Description
When configuring a new account business or institutional clients may request a voice menu – often called an IVR (Interactive Voice Receptionist) system – to direct the callers to the right person, queue or ring group (among other choices).
Intended Audience
Step-by-Step Guide
What you need before you get going:
- You prepared a flowchart mapping all the destinations
- You have the recordings ready for upload for all menus in .wav format ready for upload in the Announcements section of ClusterPBX
- The destinations (Ring Groups, Queues, Extensions (Users), Digital Receptionists, etc.) are created in the system
- Preferably a plan of what each desired menu option and their outcome is, as well as the desired behaviour if someone doesn’t press anything, or they press an invalid button, as well as on which menu are people allowed to dial out extensions and/conference
If you want to use different IVR systems for different time periods (business vs non-business hours, holidays, vacations, support hours, lunch time, etc.) you must use the Client – Time Conditions page to configure the time of days and vacation periods.
If you are a Reseller; you must be logged in under the Client account that will use the Digital Receptionist (IVR) that you are creating.
- Map out the resources needed as in the example below – as you create every object and upload every recordings before they can be added to the menu (IE: start by creating the assets on the right most side of the diagram, then work your way to the main menu)
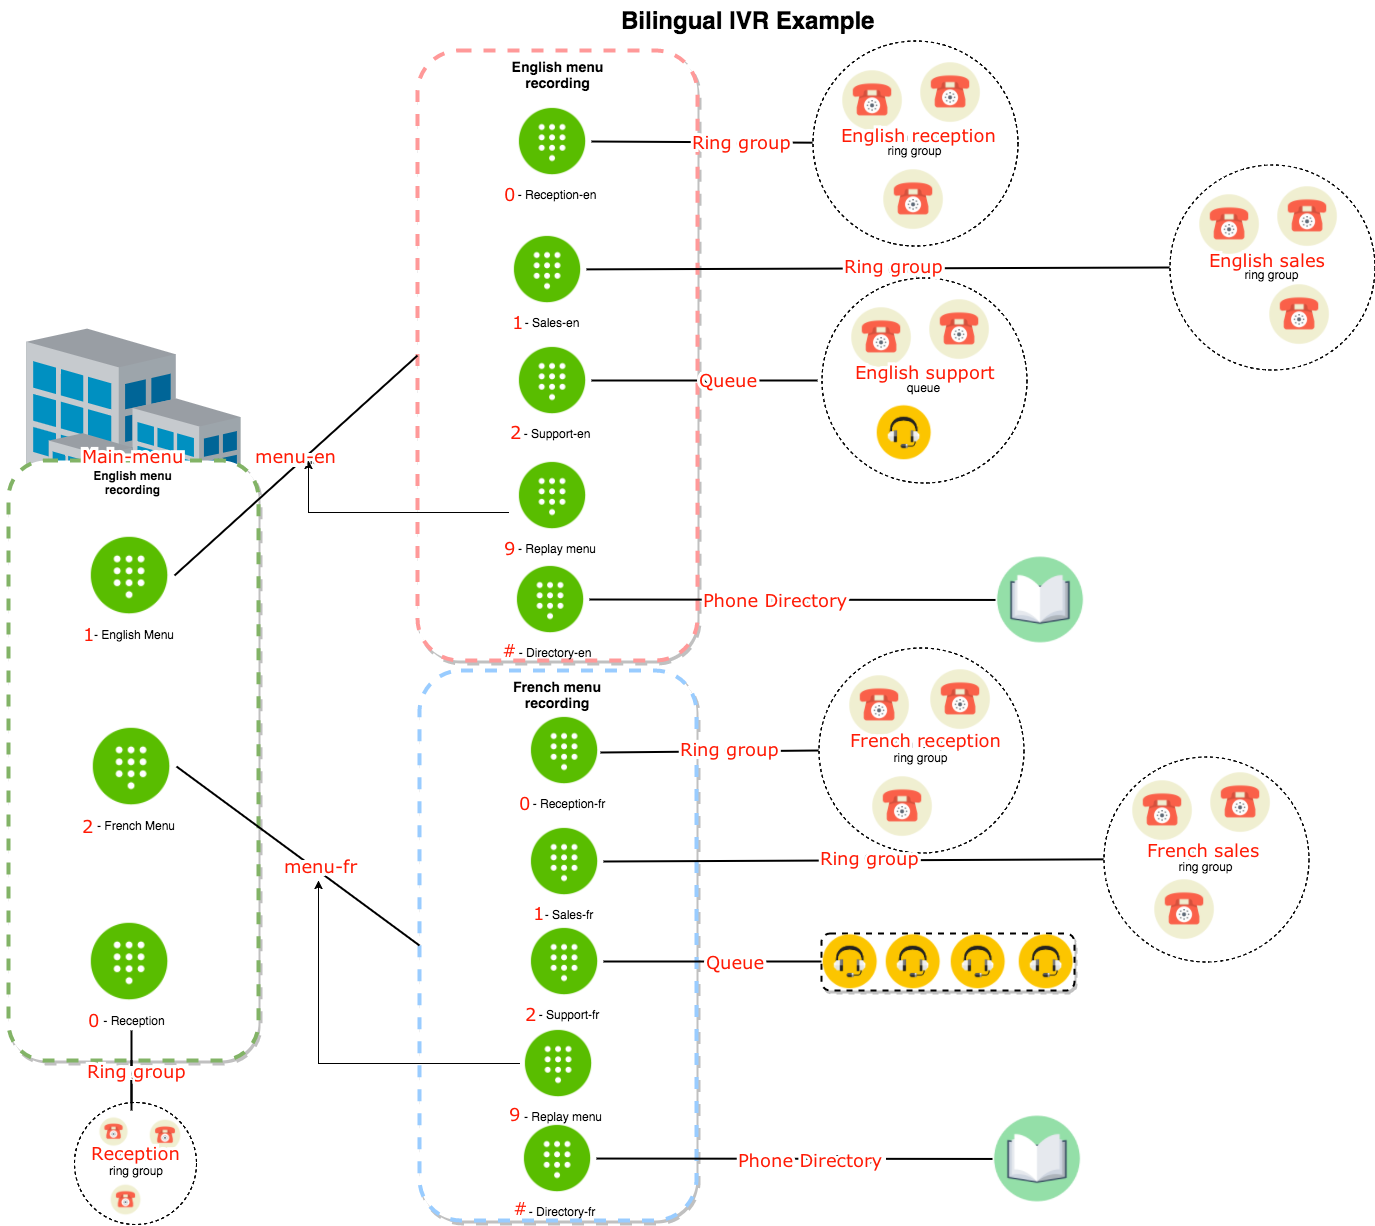
For this project you would need to create:
Two queues – How-to Create and Manage a Calling Queue
- Support-En
- Support-Fr
Four ring groups – Client – Ring Groups
- Sales-En
- Sales-Fr
- Support-En
- Support-Fr
Three IVR menu recordings – Client – Announcements
- Main-menu
- Menu-En
- Menu-Fr
- Create your destinations (Queues, Ring Groups, Extensions, Voicemails, etc.)
- Click the Digital Receptionists option in the navigation menu – This option is only on the Client level menu
- Click the Add Digital Receptionist button
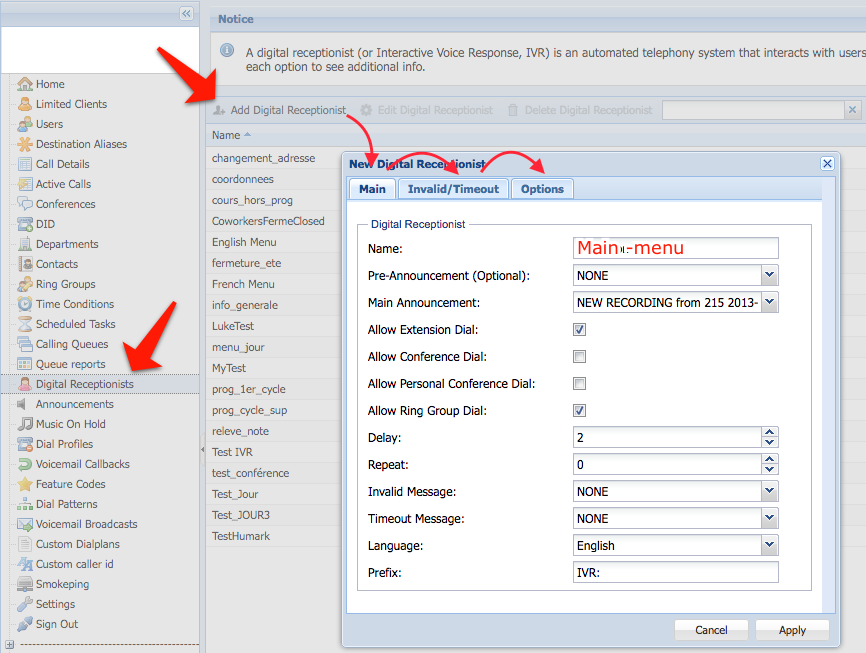
- Then fill in the information on the Main tab of the New Digital Receptionist dialog
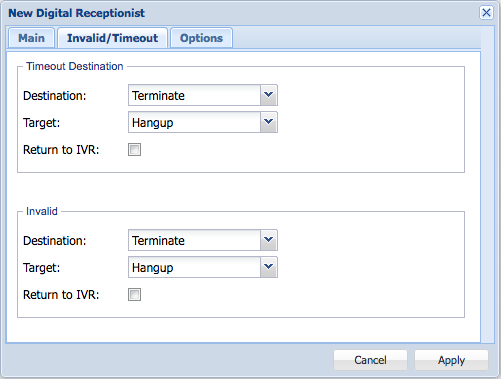
- Fill in the Invalid/Timeout tab with the desired behaviour of Timeout Destination and Invalid button press – if any
- Go to the Options tab
- Click the Add Option button to add a destination to the menu
- Enter the Input and the desired options in the Add/Edit an IVR Option window
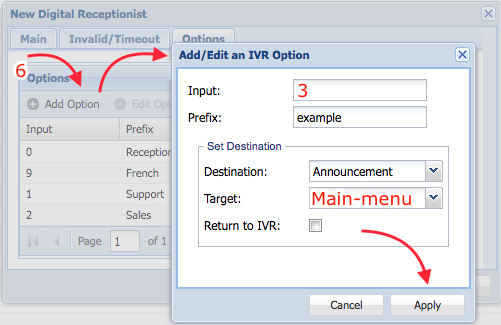
- Click Apply on the Add/Edit an IVR Option window to complete this option
- Repeat the steps above to add all the desired options to the IVR menu
- Click Apply on the New Digital Receptionist dialog to complete the IVR
Note
At this point you will still need to assign the digital receptionist as a destination – either a phone number and/or an extension.
IVR Options
- Announcement: The audio file the caller will hear when he reaches this digital receptionist.
- Allow dial: When enabled, the caller can directly dial an extension, conference or ring group number.
- Delay: The delay (seconds) before a caller is sent to an option, the announcement repeat (if any) or timeout destination. The delay starts after dialling an option, or when no key is dialled after the announcement.
- Repeat: The number of times the announcement is repeated before the caller is sent to the timeout destination.
- Invalid message: The audio file the caller will hear when he dials an invalid key.
- Timeout message: The audio file the caller will hear when no key is dialed after the announcement.
- Set language: The language of automated messages. This option only affects system messages.
- Prefix: What you write in this field will appear on the caller ID display on inbound calls to this IVR.
- Timeout / Invalid destinations: Where the caller will be sent when no key is dialed after the announcement, or when he dials an invalid key.
The Destination menu lists the categories where the call can be redirected to. The Target menu only lists the targets linked to the selected destination.
- Return to IVR: When enabled, the announcement will restart after a timeout or invalid key. To use a custom destination instead, make sure this option is disabled.